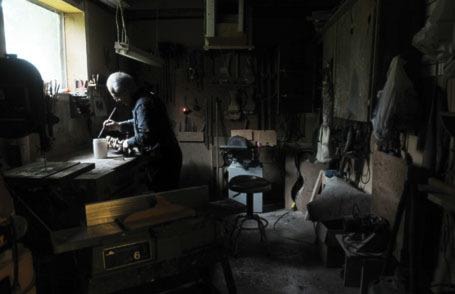
Sunlight filters through a single window, illuminating a thin layer of sawdust that covers almost every inch of workspace in Peter Grohme’s basement studio. And woodworking tools hang from the walls surrounding the counter where music is made.
Peter makes violins, mostly 14-inch standard ones based on the Stradivarius model, as well as 16-inch violas based on the same model, 7/8 violins – which have a body half an inch shorter than a standard violin. He also makes cellos, even a Hardanger violin – a Norwegian instrument with eight to nine strings instead of four.
After 10 years and 10,000 hours of meticulous labour, hunched over his bench, sanding and shaping maple and spruce into thicknesses measured in millimetres, he has completed 99 violins, although he is still working on No. 98 and is about to start on No. 100.
Somehow they all find homes, although Peter won’t disclose how much he sells them for or to whom.
It is his labour of love.
Peter pops a CD into the stereo at the entrance to his work room in suburban Maple Ridge, and turns up the volume. Vivaldi. The CD of the virtuoso violinist sits in a pile next to Willy Nelson and The Wailing Jennys.
His grey hair combed back off his forehead, wearing jeans held up with suspenders, a dark plaid shirt and tan slippers, Peter makes his way over to his work table and pulls out a partially made violin, No. 98. The top, or belly, of the violin shines in the afternoon light, the light-coloured spruce waiting to be stained.
The ebony fingerboard has already been attached, highlighting the carefully carved lion’s head perched on top.
Peter starts every violin by making the neck first. It takes forever to make the neck, he says. It is difficult to get the proportions exact with the scroll on top.
“When I finish the neck, I always heave a sigh of relief.
“Look at it,” he says with his German accent, holding the lion’s head high.
“From the top, the front, the side, whatever. Everything has to flow,” like music.
“As soon as there is something, even a tenth of a millimetre out, you will see it and it sticks out like a sore thumb. And your colleagues are going to point that out to you until the day you die.”
He starts with wooden blocks attached to a mould. They are shaped into points at the four corners of the instrument, and the top and bottom, giving the violin its classic contour.
Ribs, thin strips of maple – 1.5 mm thick and 35 mm wide – are then glued to the outside of the blocks and follow the outline of the mould of the violin. In some cases, because the ribs are so thin, they have to be pre-shaped using a hot iron. Peter uses a curling iron, and Hyde glue, because it dries quickly overnight and comes apart with water making the wiping up of excess glue easy.
After drying overnight, the lining of the violin has to be glued on. For both the blocks and the lining, Peter uses willow because it is very flexible and a tough wood.
The lining is usually 3 mm thick and 6 mm deep. It strengthens the rib structure and provides a better gluing surface to attach the front and back plates.
When the lining is in place, Peter likes to start work on the plates of the violin.
The belly of the violin is carved out of spruce that Peter purchases from a man in Valemont, B.C.
The back of the violin is carved out of maple, which he is able to get locally.
Once the plates are cut out of the wood, they have to be shaped. Using planes that he made himself, the back and the belly are arched. Using a router, Peter makes the edges of both plates. Then a small hole is drilled into the top and bottom of the belly and a locating pin is inserted to keep the plate still on the mould while an overhang from the rib structure is created using a belt sander and a knife to get rid of the excess wood.
A purfling groove is created along the edge of the belly, and plasticized purfling, purchased from a wholesaler in Ontario, is glued into the groove. Purfling will prevent the violin from cracking along the edges.
After a depression is created along the edge of the plate, Peter starts the arching process. Each plate is thicker in the middle and becomes thinner at the edge. But if a plate is shaped too thin along the edge, it will start to flutter and distort the sound.
Peter measures 196 mm down from the top of the violin. This is where the bridge is going to go, he remarks.
F-holes are carefully cut into the belly of the violin. They are called f-holes because they look like the letter f in italics. An f-hole allows sound to come out from the violin. Any slight variation of an f-hole affects the sound of the violin. For this reason, Peter replicates the Guarneri style of f-hole, a violin maker’s f-hole from the 17th century.
A notch is cut into the block at the top of the violin where the heel of the neck is fitted. The neck contains the fingerboard and the distance from the top of the plate to the top of the fingerboard has to be precisely 21 mm. A bass bar is then glued to the length of the underside of the belly.
Now the plates can be glued to the rib structure and then the violin is dyed, sealed and varnished.
Peter sets No. 98 on the counter and pulls out a white tub of glue and a thin paintbrush. Twenty wooden clamps sit at the side. Picking up the back plate of the violin, he dips the brush into the glue and strokes the thin edges of the plate with the clear sticky substance. Glasses perched on his nose, he remains silent listening to the music as he works. He leans towards the violin working with an exactness and patience that only years of experience can teach.
Peter admits he is a self-taught violin player and doesn’t play very well.
He just didn’t have the opportunity as a child to get any formal training in music.
Growing up in Berlin, Germany, he was 10-years-old when the Second World War ended. He was in his teens when he first picked up a guitar, then dabbled with the accordion, but it was nothing serious. He eventually became a merchant seaman. But when he decided to marry, he moved to Canada. In the summer of 1957, Peter and his wife arrived in Maple Ridge.
Peter became a sawmiller and was busy helping raise five children. He never gave music a thought.
When it came to retirement, Peter started searching for something to do, a hobby.
It was then Peter saw The Red Violin, a movie released in 1998, and he became curious about violins.
Now he depends on his good friend Jacek Dziobek, a professional musician in Pitt Meadows, to try out his instruments.
“I always give them to him to play for a couple of weeks,” says Peter. “ He always points out what I did wrong. It is usually fixable.”
Peter lets out a loud chuckle as soon as he is finished he gets the next one, he laughs.
“The professionals are very particular about certain points of the violin,” Peter explains. “They are not really terribly interested in what it looks like. They are interested in how it feels, how it responds, the quality of the tone.”
Jacek visited Peter the other day. “He just looked at my neck and said, ‘It is too wide.’ And lo and behold, I had not watched it properly. It was instead of 22.5 mm wide, it was 25.5 mm wide. So I had to take it down this morning.”
After the body of the violin is stained and the neck is in place, the strings are attached. A quarter-inch hole is drilled on the bottom of the violin and enlarged to the proper width with a tapered reamer. A plastic end pin is inserted and attached to the pin by the nylon tailgut is a tailpiece. The strings are strung through the tailpiece, over the bridge and inserted into the tuning pegs on the neck. The bridge is fitted to the violin.
Finally the sound post, a long circular piece of spruce 6 mm thick, is inserted through the F-hole. It runs from the top plate to the bottom plate of the violin, underneath the bridge and in line with the bridge’s right foot.
Using a piece of sandpaper, Peter sands the bottom of the bridge feet close to where it is to sit on the violin. The bridge must sit tight on the violin with no air under the feet.
Then using a jig specifically marked for instruments in the violin family, Peter makes grooves on the bridge where the strings are to go.
Now clearance from the fingerboard has to be measured before the strings are tightened. The G-string has to have 5 mm of clearance and the E-string has to have 3 mm. Now the strings can be tightened and the violin is finished.
Peter has never fallen in love with any one of the instruments he has created.
He chuckles.
“It’s always the last one. Cause, hopefully, it is the best one.”